AutoMove
- How does AutoMove work?
- Configure AutoMove
- AutoMove Options
- Setting the AutoMove Service Logon
- Using AutoMove with Recorded TV Manager AutoCopy Service
- Diagnosing Problems with AutoMove
How Does AutoMove work?
AutoMove is a Windows Service Application which is installed when Recorded TV Manager 3 is installed. The AutoMove service is OFF (Stopped) by default, and must be configured before it can be turned ON (Running). If AutoMove is enabled it will start automatically when Windows starts. See Configure AutoMove for more information.
When turned ON, the AutoMove service utilizes a timer to periodically look at the Recorded TV folder and see if there are any recordings which are eligible to be moved at that time. The default timer interval (frequency) is 30 minutes, which can be changed on the AutoMove Options tab.
To be eligible, a recording must be complete, i.e. not currently recording, and it must be older than the currently specified Wait time. The Wait time is the number of hours after the creation time of the recorded TV file to wait before moving the file. The creation time of a recorded TV file is the time (and date) that the recording started. For example, for a show recorded at 9pm and a Wait time of 2 hours, the file will be eligible to be moved at some time after 11pm. Wait time is disabled by default and can be enabled on the AutoMove Options tab.
Each time AutoMove runs, it obtains a list of current recordings in the Recorded TV folder and searches that list from the beginning. The first eligible recording is moved (or copied) to the destination folder. Once the move is complete, the timer is reset. If there are no recordings, or no eligible recordings, then AutoMove does nothing and simply resets the timer.
Configure AutoMove
 To
configure AutoMove, from the Start Menu, select All
Programs, then Recorded TV Manager, and then
Configure AutoMove. On Windows Vista and above, User
Account Control (UAC) will request permission because Configure requires
Administrative privileges. Click Yes. (On Windows XP
you must be running in an account with Administrative privilege.)
Before you can Enable AutoMove, it is necessary to define the source and destination folders.
The source folder is the folder that AutoMove looks in for eligible recordings to move. To select or change the source folder, click Browse... to open the Browse For Folder dialog box. Select the source folder and then click OK.
The destination folder is the folder where eligible recordings will be moved. Click Browse... to open the Browse For Folder dialog box. Select the destination folder and then click OK.
Important: The AutoMove service is installed for the local machine only. To specify a network location other than the local machine it is necessary to first configure the logon account for AutoMove. The logon account is the user account that the AutoMove service will run under, which must have sufficient privilege to move files across the network, otherwise AutoMove will not work correctly. See Setting the AutoMove Service Logon for instructions.
Once the destination folder is specified, click Enable AutoMove on this computer to Start the AutoMove service. (Note that the Enable checkbox will be disabled until a valid source and destination folder have been selected.) You MUST click OK to save the changes.
When Enabled, the AutoMove service will automatically stop when Windows shuts down and re-start whenever Windows starts.
AutoMove Options
MOVE - Moves eligible recordings from the source folder
to the destination folder. (A move is a copy followed by a delete.)
COPY - Copies eligible recordings from the source folder to the destination folder and leaves the original in the source folder. Note that the next time AutoMove runs, files that have already been copied will no longer be eligible because there is a duplicate file name in the destination folder. Duplicates will not be copied again.
Wait before Move/Copy - Specifies a Wait time in hours before a recording becomes eligible. Click the checkbox to enable Wait time and then set the number of hours to wait. (One hour minimum.) The Wait time is the number of hours after the creation time of the recorded TV file to wait before moving the file. The creation time of a recorded TV file is the time (and date) that the recording started.
Check for recordings every - Specifies the frequency in minutes that AutoMove will run. (Minimum 15 minutes.)
When setting AutoMove options, you must click OK to save and apply the changes. Clicking Cancel will discard any changes you have made.
Setting the AutoMove Service Log On
Important: The AutoMove service is installed for the local machine only. To specify a network location other than the local machine as the destination folder, it is necessary to first re-configure the Log On account for AutoMove. The Log On account is the user account that the AutoMove service will run under, which must have sufficient privilege to move files across the network to the desired destination folder, otherwise AutoMove will not work correctly.
If AutoMove is Running, un-check Enable AutoMove on this computer to Stop the service before changing the service log on.
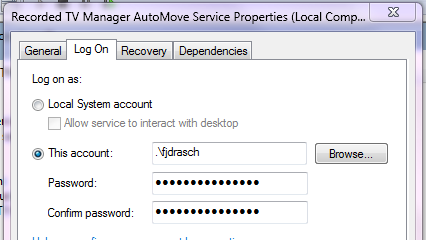
On the General tab select Configure... to open the Windows Services application. Scroll down to Recorded TV Manager AutoMove Service and double-click to open the Properties dialog. Select the Log On tab. The default setting is Local System Account which will only support moving files to other folders and disks on the local machine.
In order for AutoMove to move recordings to network locations, such as the Windows Home Server, NAS or other network computer, it is necessary to specify a user account with sufficient privilege to access the desired destination folder (Full access). This would usually be an account on the local machine with Administrative privilege (other than any built-in accounts).
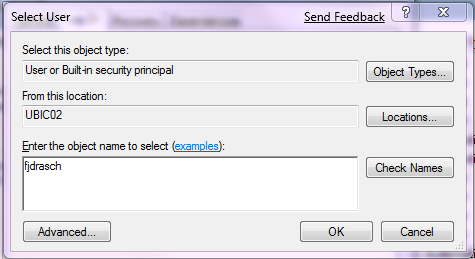
Click This account: and then click Browse... to open the Select User dialog.

In the object name box, type a valid user name on the local computer which has Administrative privilege and click OK.

Enter and confirm the password for the selected user account. Select OK to close the Properties dialog and then exit the Windows Services application to return to the Configure AutoMove dialog. Click Enable AutoMove on this computer to restart the service with the new log on account.
Using AutoMove with Recorded TV Manager AutoCopy Service
Recorded TV Manager 3 local AutoMove is completely independent of the Recorded TV Manager Add-in for Windows Home Server AutoMove functionality and also the OnCreateAny rule type in Recorded TV Manager Console..
- It is recommended that if you enable local AutoMove that you do not also enable AutoMove (or OncreateAny) for the same machine.
- AutoCopy Collection rules (OnCreate) will always supersede local AutoMove because AutoCopy rules will fire immediately after the recording completes. Enabling a Wait Time will insure that any AutoCopy activity by the WHS is complete before the file becomes eligible to be moved by local AutoMove.
Diagnosing Problems with AutoMove
If local AutoMove is configured but not working correctly, check the Recorded TV Manager Eventlog on the local machine for error messages:
apply_AutoMove error: - This error message is generally an "access denied" error which means that the Log On account for the AutoMove service does not have sufficient privilege to access the folder. See Setting the AutoMove Service Logon
AutoMove Service NOT CONFIGURED - See Configure AutoMove
AutoMove error=<message> - General start-up error. Delete the file AutoMove.xml and re-configure the AutoMove service. Locate the file AutoMove.xml as follows:
- On XP Media Center
C:\Documents and Settings\
All Users\Application Data\
Drasch Computer Software\
Recorded TV Manager\Data - On Vista or later
C:\ProgramData\
Drasch Computer Software\
Recorded TV Manager\Data